


Slowly let off the pressure on the Power Bleeder by unscrewing the air pump.
The tools needed are:
• 1 Liter can of Ate Typ 200 Brake Fluid
• Power Bleeder (we do not recommend
vacuum bleeders)
• Overflow collection bottle and clear tubing.
Check out this article to make your own
collection bottle.
• 11 mm open end wrench (flare is recommended)
• Car lift or hydraulic jackand set of sturdy stands
• Wheel lug wrench (and security socket if used)
• Flexible light source to illuminate the wheelwell
• Paper towels or rags
• Piece of 2 x 4 lumber or assistant for clutch bleeding
• A couple of empty 5 gallon buckets
• Small tray holding water to neutralize any fluid spill
There are two terms that sometimes are used synonymously, but which are not:
Bleeding the Brakes and Flushing the Brakes.
Bleeding the Brakes is a quick procedure to remove any unwanted gas bubbles from the calipers and lines.
Flushing the Brakes refers to replacing the entire brake/clutch fluid contents
The factory recommends flushing every two (2) years, regardless of use.
Why? you ask.
Brake fluid is very hygroscopic, meaning that it absorbs water. It will absorb water from the ambient through thr flexible brake lines and through the plastic walls of the fluid reservoir. Brake fluid boils at around 400ºF while water boils at 212ºF, so once water gets into the calipers it will boil and release water vapor bubbles, which contrary to the liquid, will now allow for compression, altering the effectiveness of the brakes.
A quick bleed is fine at the track, between sessions, but I personally flush my brakes right befor each and every track day. Also, once you open a new can of brake fluid you need to use it immediately as it cannot be stored.
In the past, we used to alternate fluid color every time we flushed the system This made it very aoparent to see when the old fluid had been replaced with the new fluid, as the color changed from blue to gold or vice versa.
Several years ago, Blue Ate was taken off the market so now it's a moot point.
Note: The photos and instructions shown below are for early 986, but all of the water-cooled Porsches are very similar in that regard.
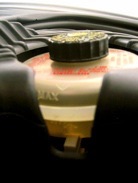
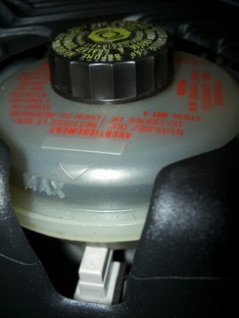
The Brake Fluid Reservoir is located in the front trunk, on the driver's side.
You can lift the four wheels off the ground and remove them (my preference) or you can remove them one at a time.
Start with the farthest wheel from the reservoir and then work towards the closest. The recommended sequence is:
1.- Right rear
2.- Left rear
3.- Right front
4.- Left front
5.- Clutch master cylinder (manual transmission).
The procedure will be the same for each wheel.
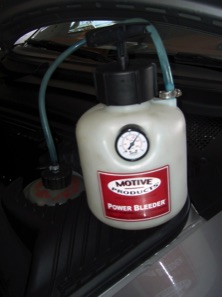
Choose the brake fluid to use and empty all the contents of a newly opened can into the Power Bleeder.
I like to place the Power bleeder inside an empty plastic bucket. In case of any leaks or spills the bucket will act as secondary containment which can avoid possible damage due to the fact that fluid can damage paint.
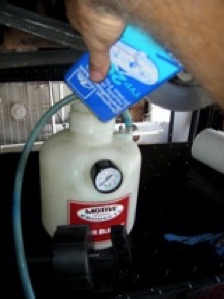

Pressurize the Power Bleeder to 20 psi.
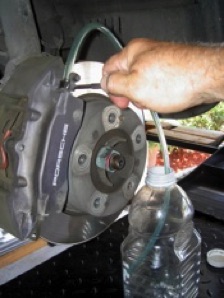
Starting with the right rear:
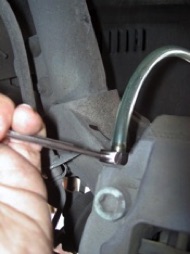
Uncap both caliper nipples
Connect a clear hose to the inside nipple and route the other end to a claer plastic bottle for collection.
Using the 11mm wrench slowly turn the nipple CCW
Observe the fluid coming out. Once you reach the amount for that wheel close the flow by turning the nipple CW. This does not need to be too tight.
Move the tube to the outer nipple and repeat the procedure.
Note that the time for new fluid to flow is greatly reduced, as it only has to flow from the inner part of the caliper to the outer part (5 - 10 seconds).
Now you can repeat the same procedure on the other three calipers. Periodically, check the Power Bleeder's pressure gauge and pump back to 20 psi when needed.
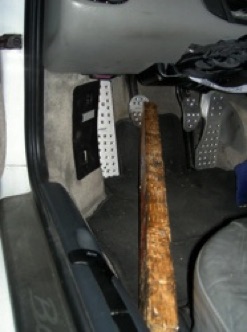
Before you start bleeding the clutch, you need to completely depress the clutch pedal, to open the master cylinder and the pedal needs to be depressed during the entire clutch bleeding operation.
Either have an assistant depress the pedal or cut a piece of 2" x 3" lumber, or similar so that it can be wedged between the depressed clutch pedal and the seat rail, as shown.
When finished bleeding the clutch, you will need to manually pull back the clutch pedal as it will not initially return on its own when you remove the lumber or the assistant's foot.
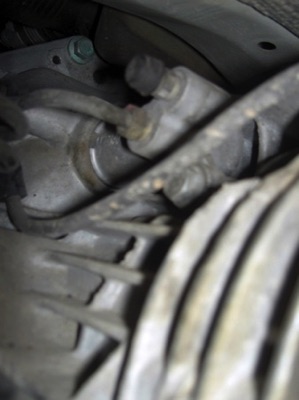
Bleeding the clutch is the toughest part of the procedure because the clutch bleed nipple is difficult to get to comfortably. It is located on top of the transmission, on the driver's side and has a black plastic cap to protect the nipple from dirt.
Once you locate it, you'll have to place the 11 mm wrench on the nipple (here the closed end works better) then insert one end of a long clear plastic drain hose onto the nipple and the other end to a collection bottle.
Slowly open (CCW) the nipple and let the system flush until the correct amount of fluid has been drained.
Tighten the nipple, remove the drain hose and recap the nipple.
Make sure you clean up any brake fluid spills because it can strip paint from painted surfaces and is corrosive.
Brake fluid will wash off with water from hands, tools or clothes.
Check to make sure that the brake fluid level in the reservoir is at the MAX indication (with the car level).
Don't forget to do this ever two (2) years or before every track day.
MAINTENANCE
Bleeding Brakes & Clutch

Happy Boxstering,