


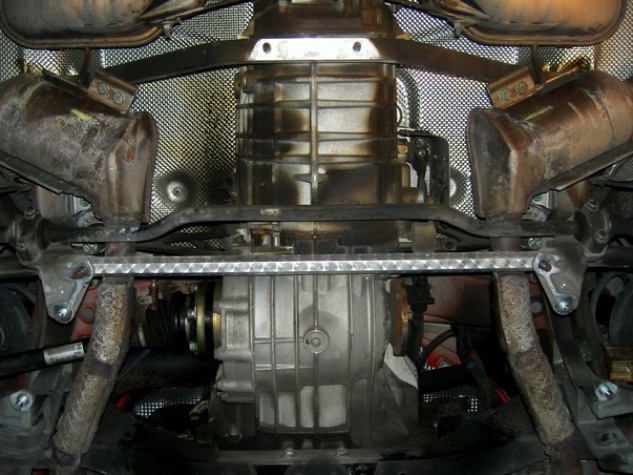
The technoBrace™ system has been carefully handcrafted it to fit precisely between the lower rear suspension supports and will allow constant rear camber settings to be maintained through heavy G-loading turns at the track.
Installation of the technoBrace™ will not alter any suspension settings and is fine for street use.
Your technoBrace™ has been manufactured from high-quality 22.2 mm (7/8”) solid aluminum hexagonal bar (alloy 6061).
We also include two (2) M10x50 automotive strength bolts to replace the existing studs.
Tools needed for installation:
Heavy Hammer or Small Mallet – for stud removal
13 mm socket for swaybar bushings – torqued to 23 Nm (17 ft-lb)
15 mm socket for TechnoBrace nuts – torqued to 65 Nm (48 ft-lb)
Torque Wrench.
Mounting Instructions:
1.- Safely raise your car’s rear end in order to give you enough clearance to work underneath by using a jack and support stands, a lift, or a pair of strong automotive ramps. Some 987 and Cayman customers have reported being able to install the technoBrace™ without raising the car.
2.- Loosen (but do not remove yet, the two rearmost nuts that hold the structural bars and skid plate (fig. 1). The nuts are identified with red arrows. Do not loosen any of the other nuts that support the structural brace while the car is loading the suspension. This will maintain your alignment settings.
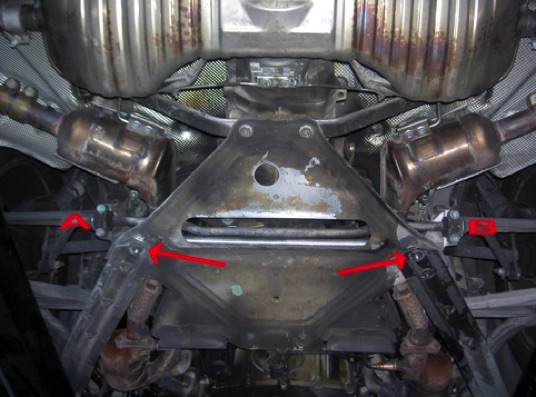
Fig. 1
3.- Loosen the nut until the end of the threaded stud is flush with the nut and hit it squarely with a heavy hammer or small mallet (fig 2). This should dislodge the stud (fig. 3) to the point where you can remove it (upwards). Be careful not to damage the nut’s threads (they will be re-used).
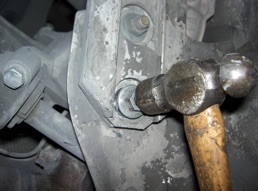
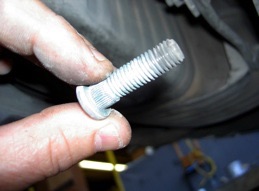
Fig. 3
Fig. 2
After both studs have been removed, slide the technoBrace™ into place. Some owners have reported that the ttechnoBrace™ will slide into place with just a bit of maneuvering, but for an easier install, loosen one or both sides of the rear anti-sway bar busing(s), identified: A and B (fig 1). Pull the sway bar downwards while pushing the technoBrace™ into place.
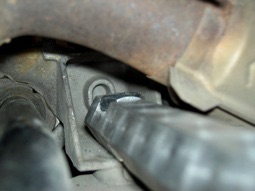
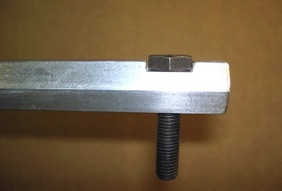
Once the technoBrace™ is in place, between the rear suspension supports (fig 4.), rotate it so that the bolt’s head cut-out is on top t (fig. 5). Insert the supplied M10x50 bolt through each hole on the technoBrace™ end, making sure that the hex head of the bolts fits into the Brace’s recess (fig. 5). The new bolt needs to go through the technoBrace™, through the Lower Suspension Support, through the Structural Brace and out the bottom. It may be a tight fit in some model years. In some cases the skid plate may have moved a fraction and a rat’s tail file can rectify the alignment so that the new bolt can come through.
Finally, using the original nuts, tighten the system using a torque of 65 Nm (48 ft-lb). Because of the technoBrace™ hex bolt head recess you do not need a wrench for the bolt, just for the nut.
Also replace and/or retighten any other system or component removed or loosened for the Brace’s installation such as the swaybar bushings which should be torqued (17 ft-lb).
Happy Boxstering,
Pedro

PERFORMANCE
Install the technoBrace